
Creating a webpage for free can seem like a daunting task, especially when you’re juggling multiple clients or projects. As a freelancer or digital agency, you know that time is money, and any tools that can save you both are worth their weight in gold. Maybe you’ve tried various platforms only to be hit with hidden fees or limited customization options. Or perhaps you’ve struggled with complicated tools that take more time to learn than they’re worth.
What if there was a way to create a professional, fully customizable webpage without spending a dime or sacrificing your valuable time? This is where SuperOkay comes in. SuperOkay’s Pages feature empowers you to create stunning, web-like pages quickly and effortlessly, all while staying within budget—because it can be accessed for free.
In this guide, we’ll walk you through exactly how you can create a webpage for free using SuperOkay Pages. We’ll cover the steps, features, and benefits, so by the end of this article, you’ll have the knowledge and confidence to build your own webpage with ease.
How do I create a webpage for free?
SuperOkay offers a fantastic new feature called Pages, which makes creating a webpage free and incredibly simple. If you’re looking to avoid complex setups and hefty fees, this tool is designed with you in mind.
To get started, all you need to do is create a free account at SuperOkay.com. This platform is specifically tailored for freelancers and digital agencies, offering an array of tools to manage client projects seamlessly. But today we’re focusing on the new Pages feature.
With SuperOkay Pages, you can create SuperOkay Documents, which are highly customizable web-like pages that can be shared with clients or used as standalone webpages. These documents are perfect for presenting project updates, portfolios, proposals, or any other content you need to share. You can customize the layout, colors, and content to match your brand or project style, making it look professional without needing any coding skills.
The best part? Our free users have 1 Page included in their plans. Unlike many other platforms that charge for basic customization or limit your ability to share your work, SuperOkay gives you full access to customization features at no cost. This means you can create a web page tailored exactly to your or your client’s specifications, and share it easily. Whether you’re presenting a proposal, showing off a portfolio, or sending a detailed project update, SuperOkay Pages makes it all possible for free.
How To Create and Use SuperOkay Pages
Creating a SuperOkay Page is a breeze, let’s break it down:
1. Create a free SuperOkay account by clicking here
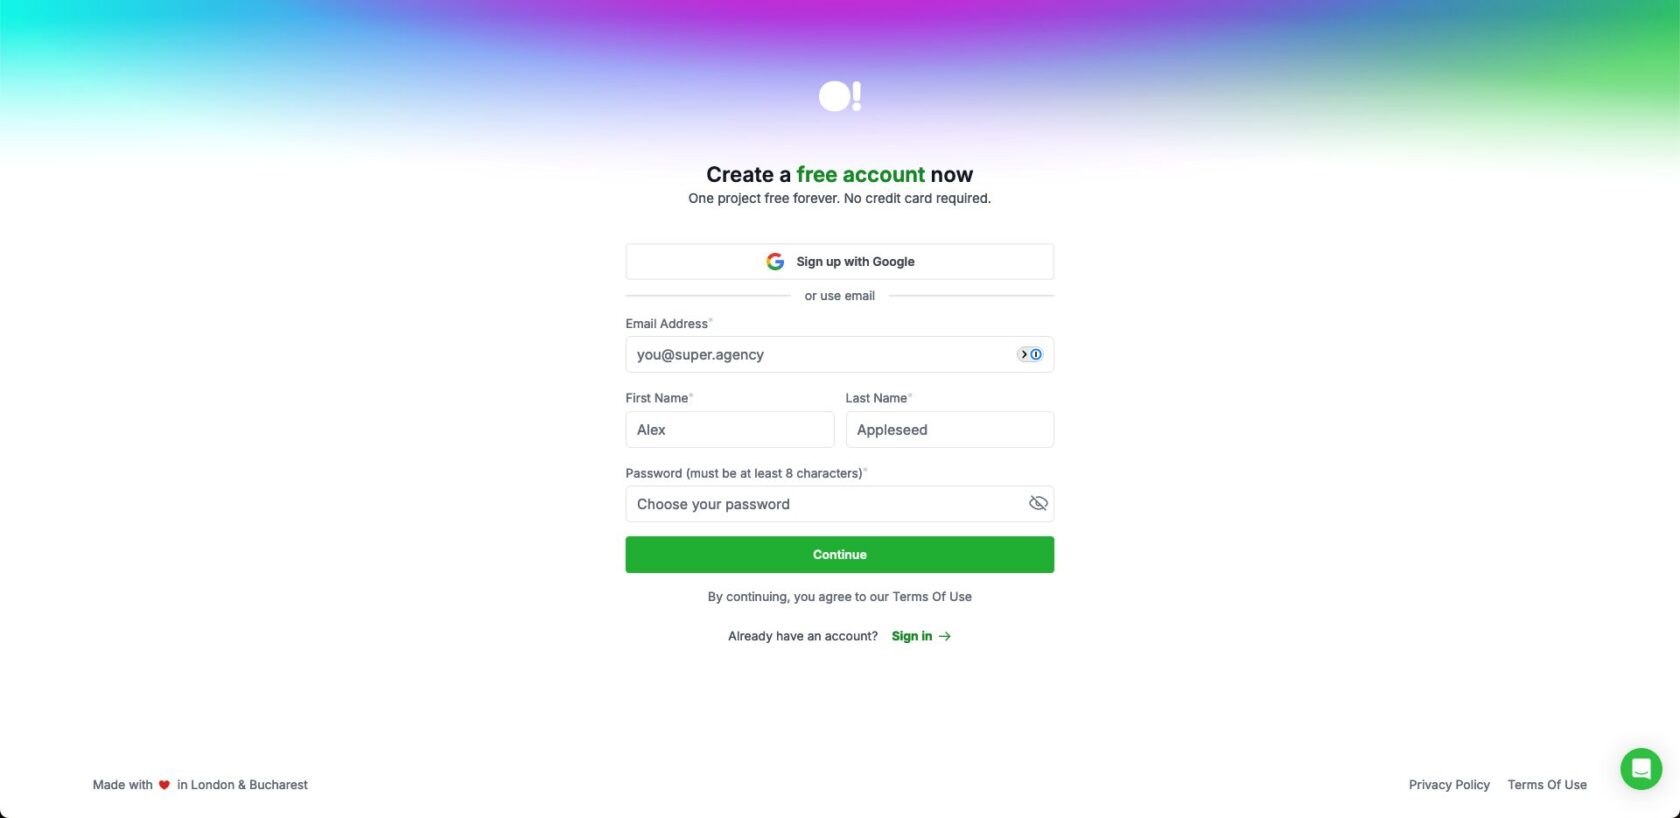
Creating a SuperOkay account is totally free and doesn’t require a credit card. On the free tier you’ll be limited to 1 Page and other usability limitations you can find here. You can always upgrade your plan to one of our paid subscriptions if you want to improve the functionality of SuperOkay.
2. Turn on Pages from the Modules section in Project Settings
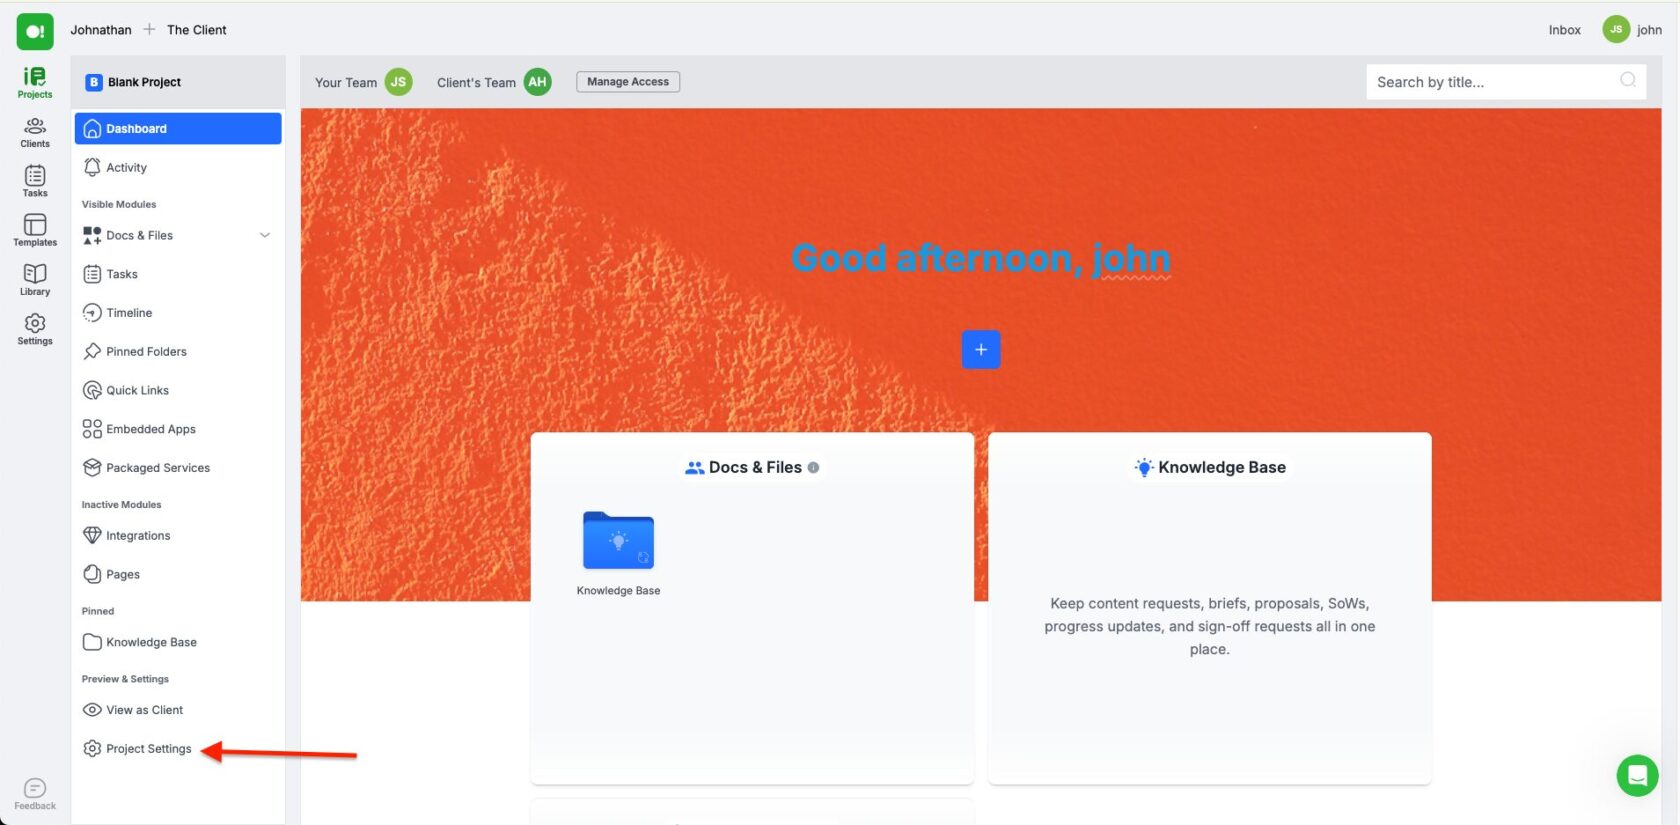
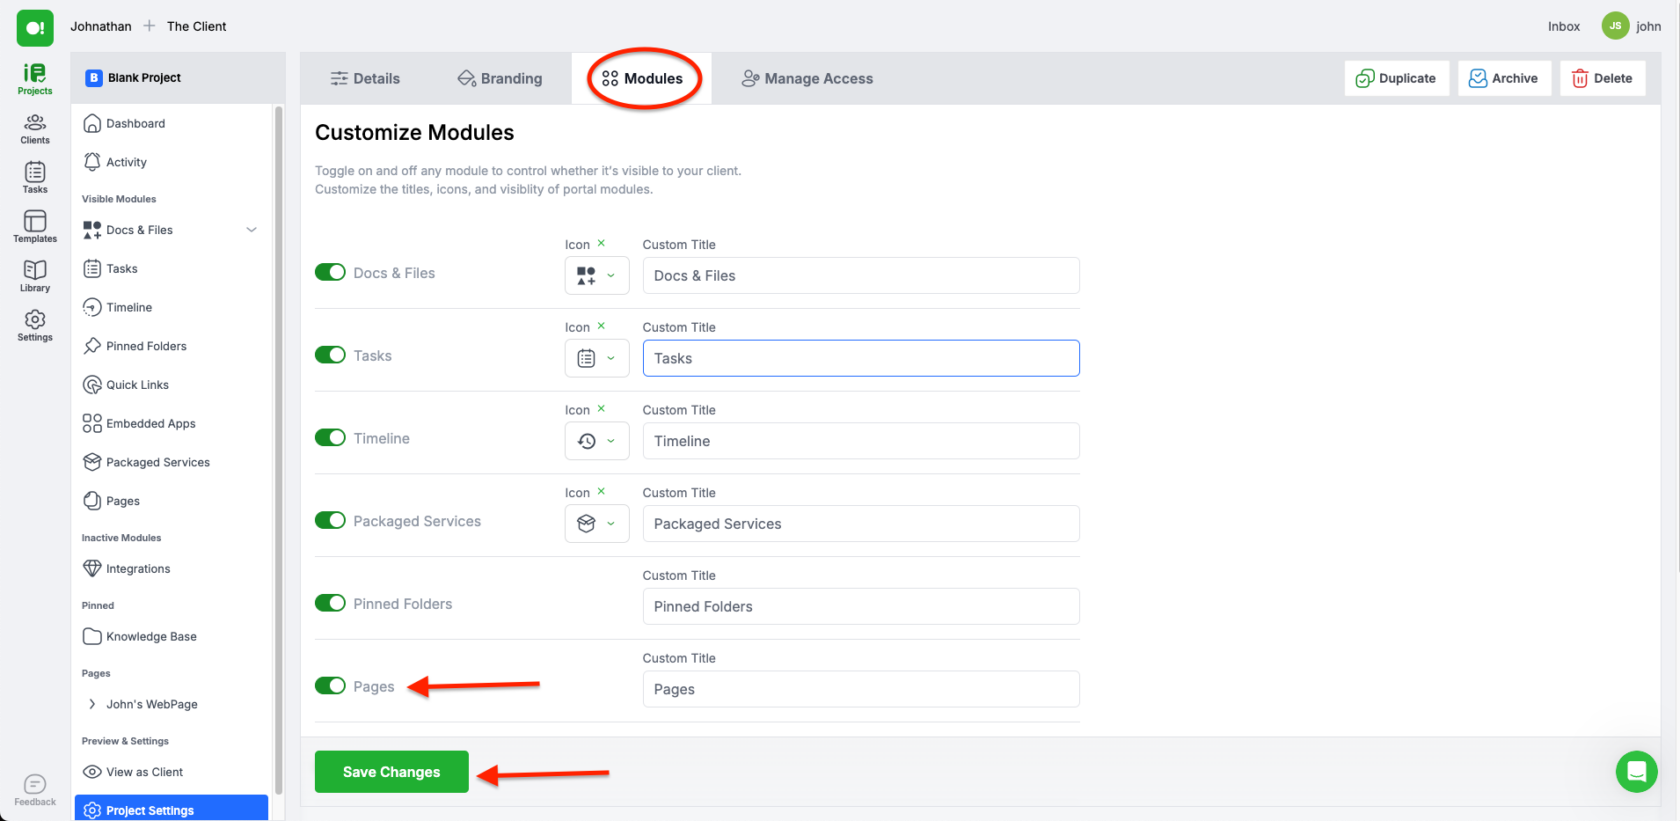
After going through the onboarding process, you’ll land in a brand new SuperOkay Client Portal, totally ready for you to use. At this point, you need to go into Project Settings, Modules and turn on the Pages Module. Don’t forget to save changes before leaving the page, or the changes won’t register. You can come back to this menu later and turn off any sections you don’t want to show on your Portal.
3. Add a Client and a Client Contact to your Project
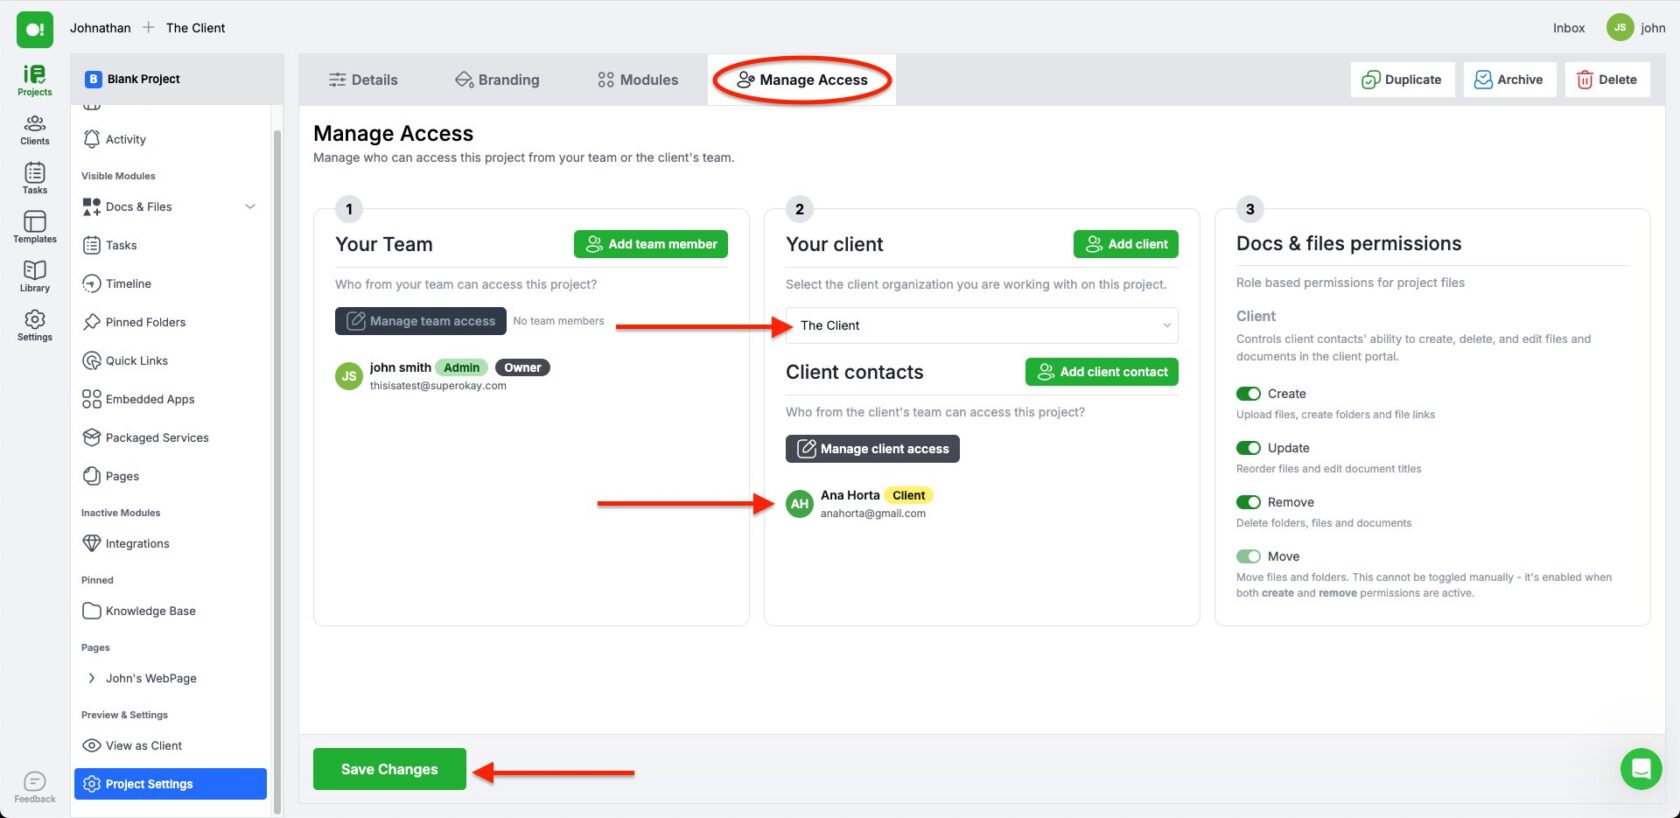
In order to be able to share your Page, you’ll need to assign a Client (organization) and a Client Contact (person in the organization). To do so, while in Project Settings, click the Manage Access tab (on top). Then on the menu in the middle of the page (2 – Your Client), create “Add client” and “Add client contact” to assign an organization and a person to your project.
4. Access the Library and create your Page
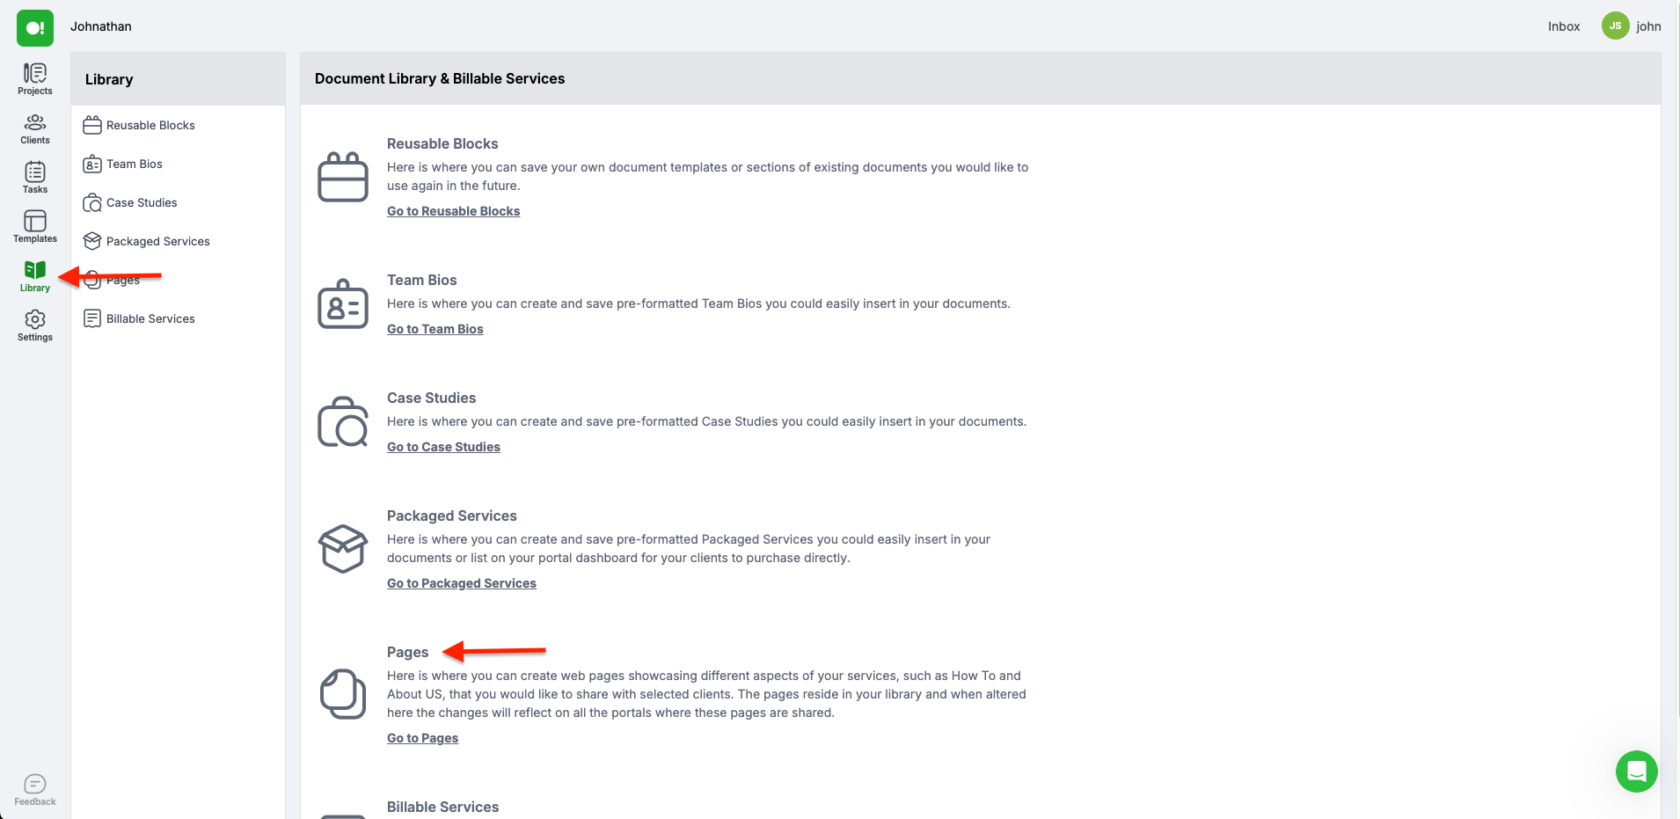
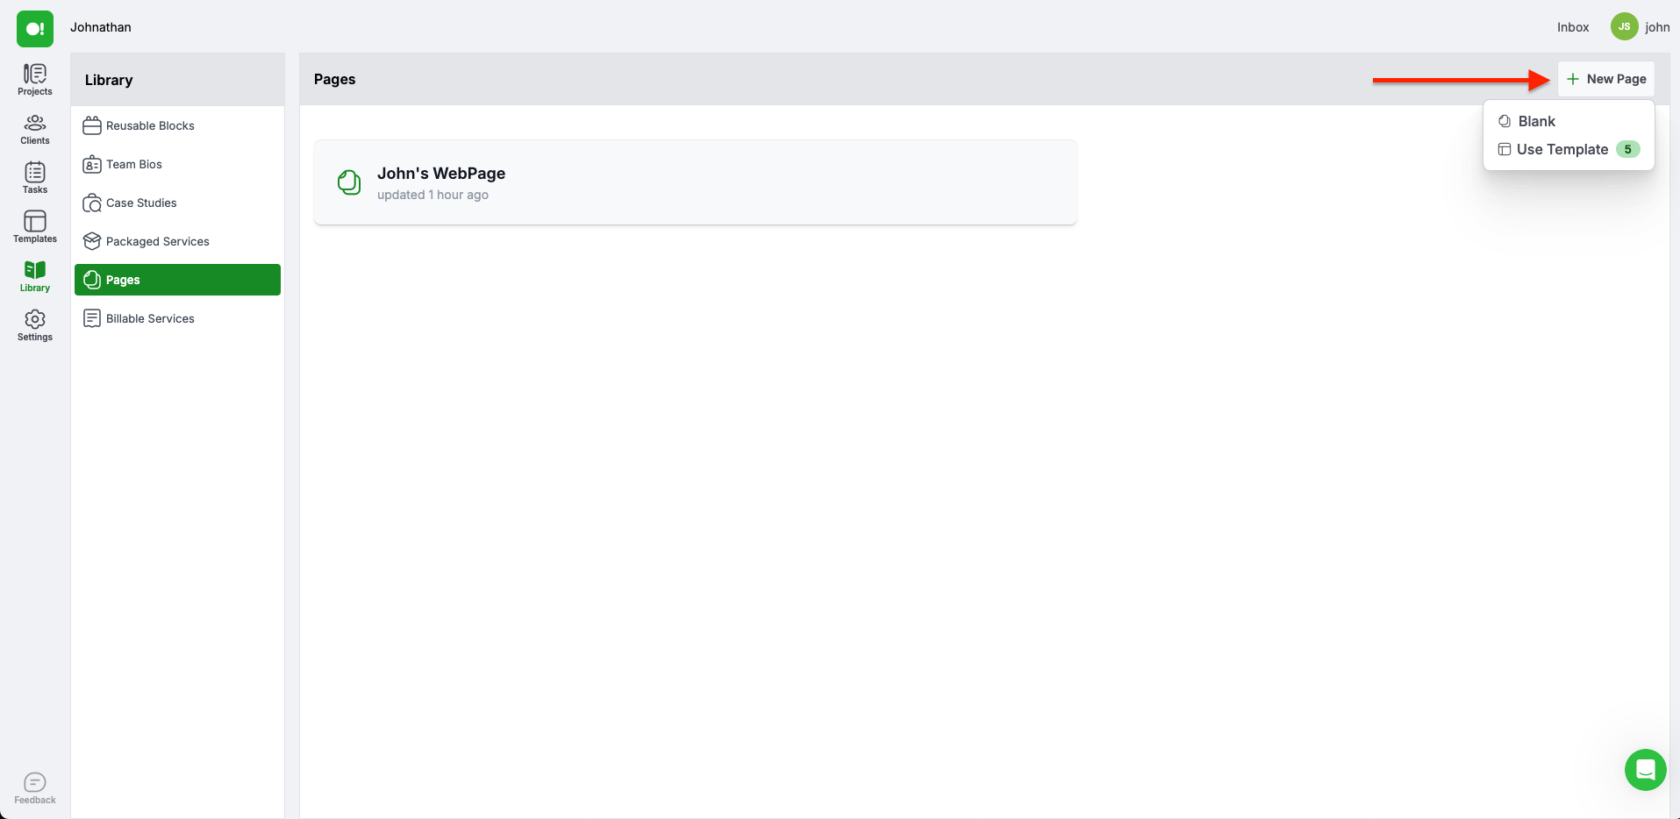
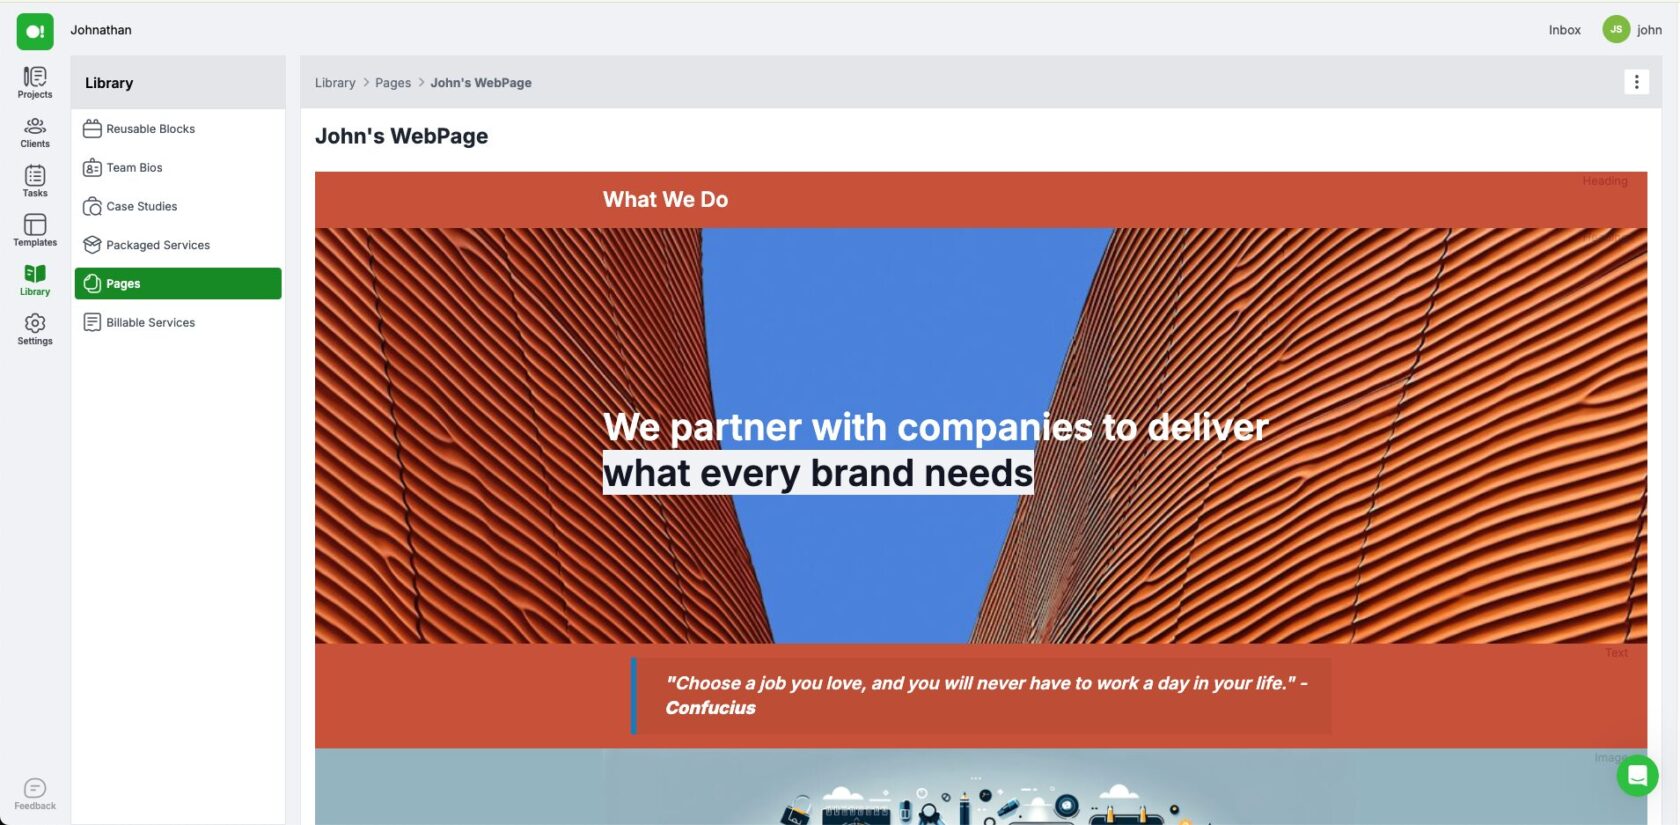
Now let’s create your Page. Go to the Library from the far left menu and choose Go To Pages. From here click the New Page button and choose either Blank, to start a page from scratch, or Template, to use one of our pre-made Page Templates. Whichever you choose, you always have the flexibility to change everything and customize it to your needs, just like normal SuperOkay documents.
5. Assign the Page to your Project
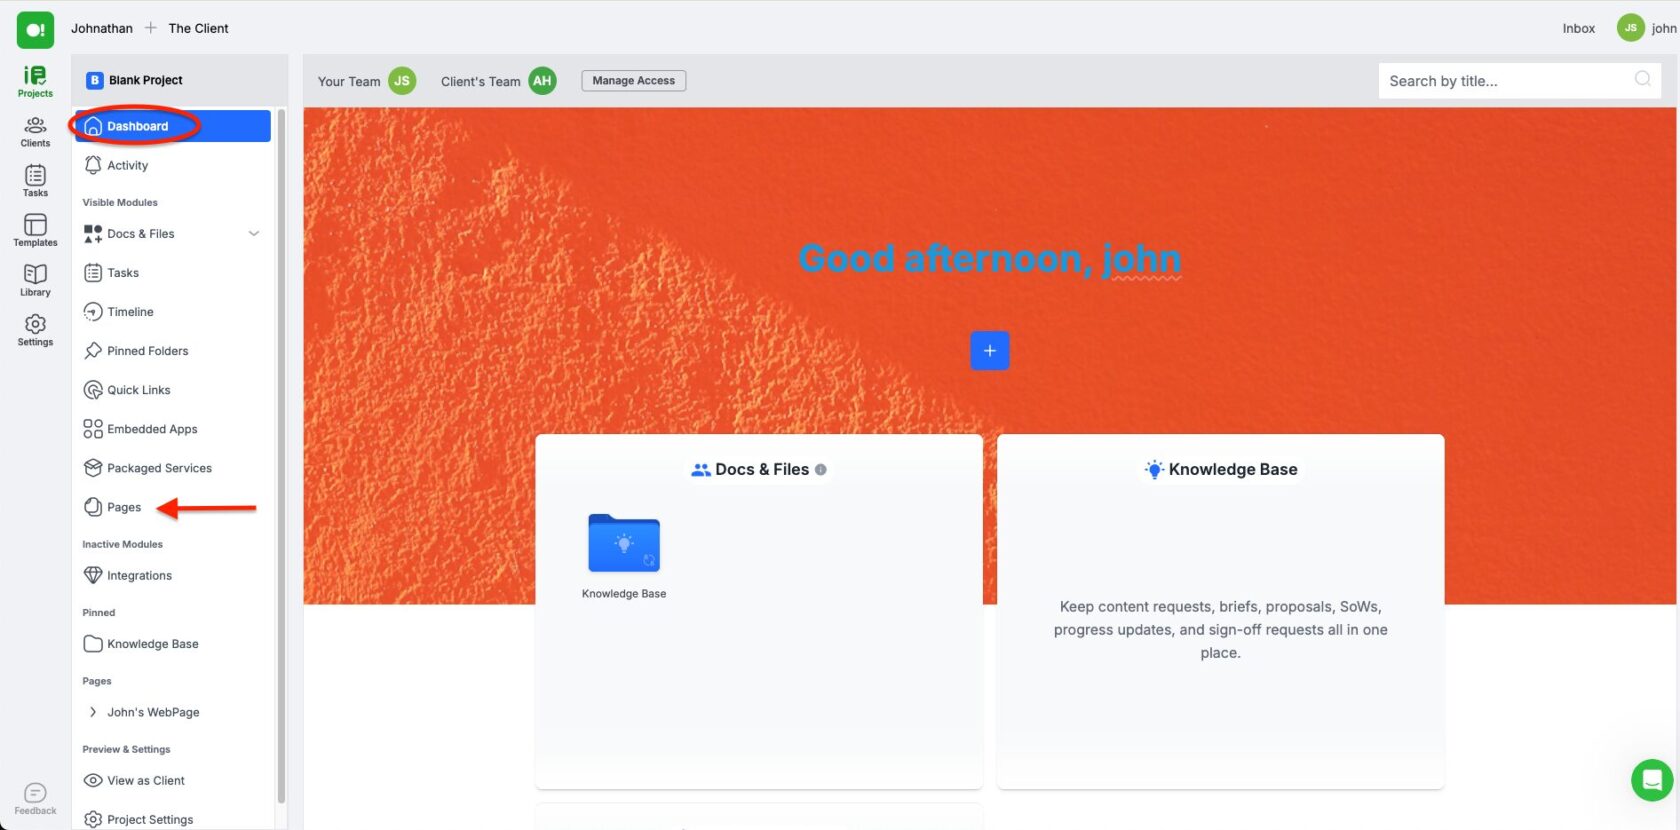
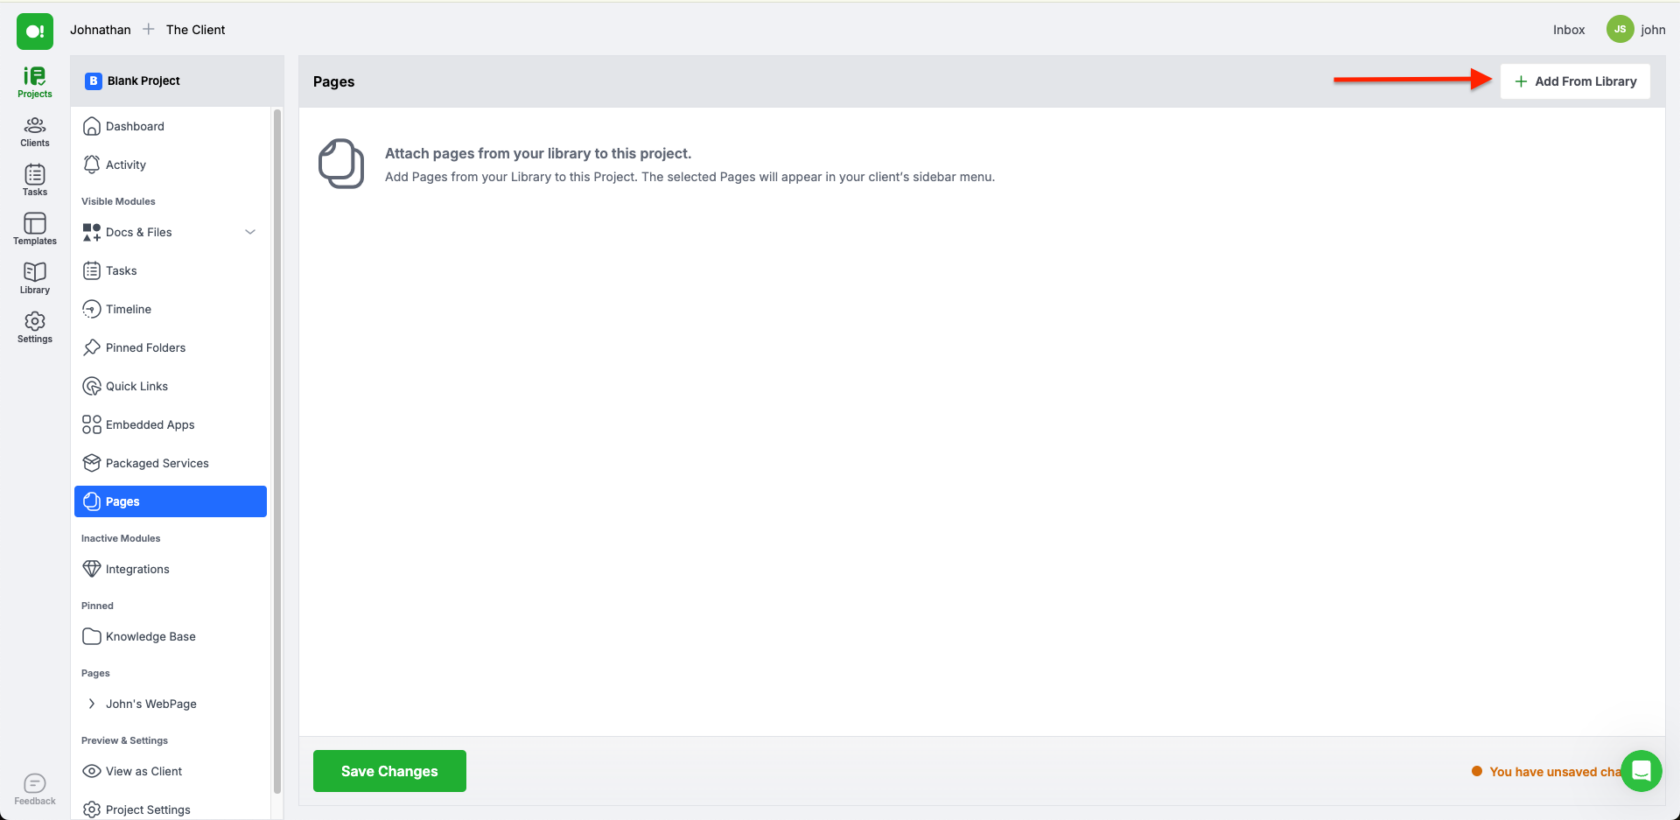
Go back to your Portal Dashboard and click Pages. From there click the Add From Library button and choose the page you just created. Don’t forget to save your changes before leaving this page.
6. Share your Portal with anyone
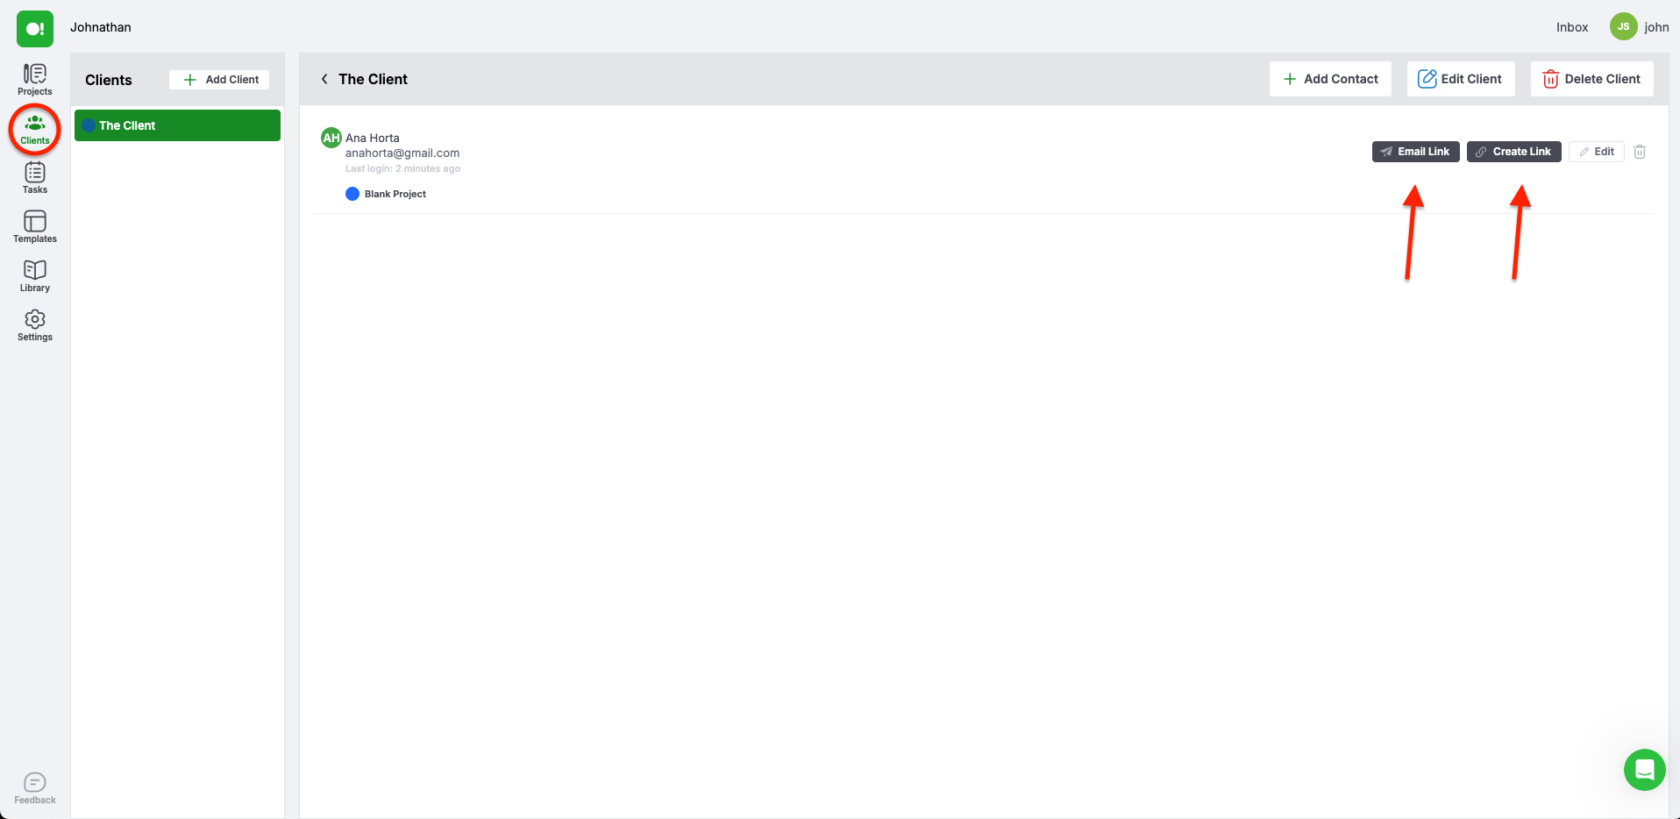
After you’re done customizing your Page and Portal to your liking, it’s time to share them. Go to the Clients tab from the far left menu and choose the Client Organization assigned to your project. From there you’ll see two options in front of your Client Contact “Email Link” or “Create Link”. Email Link will send your contact a link to your portal via the email address you assigned to them. Create Link will generate a link that will allow your contact (or anyone else with the link) to access the Portal.
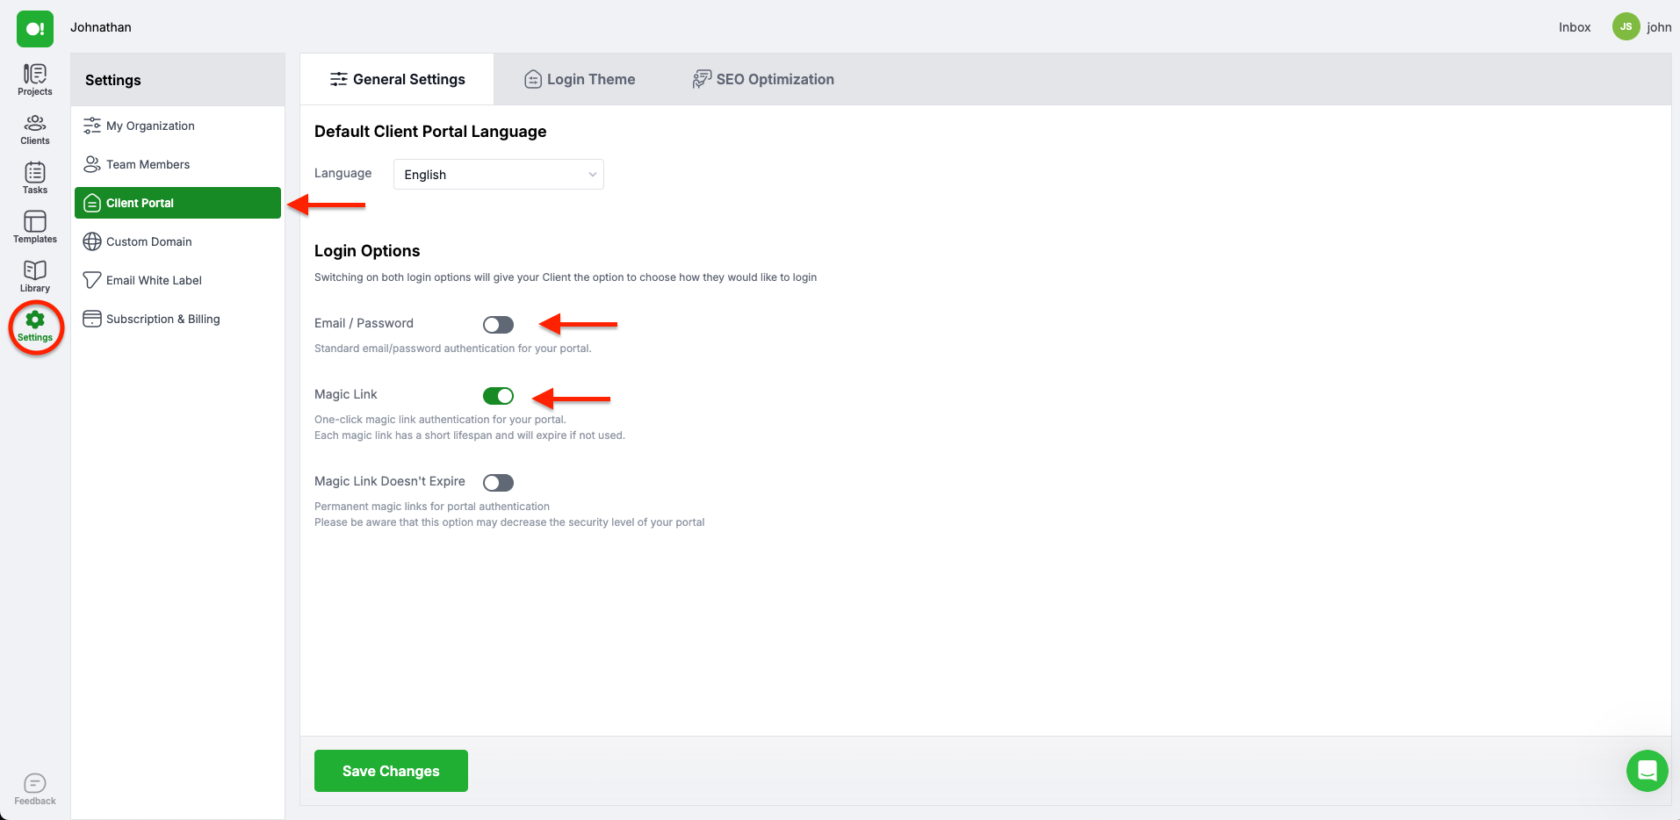
When your clients (or other people) access your Portal, they will either have to do so via Magic Link, which allows for automatic login via the link itself (great if you want to share your page with many people) or via Email/Password combination (great if you want to give access only to one person). In order to choose which method you want, go to Settings from the far left menu and choose “Client Portal”. From here you can pick either option or pick both if you want to give your client the option to choose.
And there you have it!
SuperOkay Pages is the easiest and quickest way to create a webpage you can share with anyone for absolutely free.
And remember, if you want to create more pages or interact with more clients, you can always upgrade to one of our paid subscriptions.
Frequently Asked Questions
Can I really create a free webpage using SuperOkay Pages?
Yes, you can create a free webpage using SuperOkay Pages. SuperOkay provides all the tools you need to design and customize a professional-looking webpage without any costs. Simply sign up for a free account, and you can start creating and sharing web pages with your clients right away.
How customizable is a free webpage created with SuperOkay Pages?
A free webpage created with SuperOkay Pages is highly customizable. You can adjust layouts, colors, fonts, and content to match your brand or project style. Whether you’re creating a portfolio, an FAQ page, or an About Us section, SuperOkay Pages gives you the flexibility to tailor everything to your specific needs.
How do I share a free webpage with my clients?
Once you create a webpage using SuperOkay Pages, you can easily share it with your clients through the Client Portal. The page will appear in the sidebar menu under the Pages category, making it accessible and easy for your clients to find and view.
Can I use a free webpage across multiple projects?
Yes, you can use a free webpage across multiple projects in SuperOkay. After creating a page in your Organization Library, you can activate it in any project’s settings. This feature allows you to display the same information across different client portals, ensuring consistency and saving time.
How do I update a free webpage if I need to make changes?
Updating a free webpage is simple with SuperOkay Pages. Any changes you make to a page in your Organization Library will automatically reflect across all the projects where that page is displayed. This ensures that your clients always have access to the most current and accurate information.
Are you already using a Client Portal? SuperOkay gives you 1 client portal free forever to start creating professional-looking Client Portals, custom branded to your clients’ brands – Start today by clicking here!

4 Reasons To Use Project Management Software with Client Portal
Collaboration plays a crucial role in successful project management. Effective teamwork, communication, and coordination among team members and stakeholders are essent…

Client Service: How to offer the best
Delivering exceptional client service is fundamental to any successful business. It goes beyond meeting basic expectations and involves creating memorable experiences …

eCommerce Development Rates in 2024
Worldwide Average: $64/hour Before you start an eCommerce development project, it’s essential to figure out your budget. Knowing the global rates for eCommerce d…

How to build a brand online
As a freelancer, knowing how to build a brand online is essential to standing out in a competitive market. A strong online brand can help establish your expertise, bui…